Saturday, December 10, 2011

Those critters!

There is a big difference between critters and varmints: critters are animals you have that you want to keep, varmints are animals you have that you want to get rid of. I love deer and bunnies, but to tell the truth, their recent behavior in my garden has made them varmints! They ate my broccoli, cabbage and collards down to nubs, even with protective fencing, and deprived me of my fall garden. By spring we will be better prepared with an expanded wire fence and electric fence.

But this post is about critters, not varmints, and how they benefit us and our family. Alli, our kitty, is foremost on my list of useful critters.
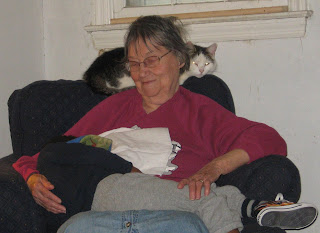
She is ten years old, has survived many a fight and having her back leg bit completely through, breaking the bone. It took her three days to come home, and by that time she had a  horrible infection and the bone could not be set, so Dave and I washed it out two or three times a day with warm water and iodine and kept her confined. Boy was she mad about the cage. She healed up so nicely that you would never know about the leg, unless you looked at her when she was walking and noticed that back leg was crooked. Even at her advanced age she is perky and still a terrific mouser and chaser down of voles. We get our fair share of presents! But the things I love most about kitty is what she does for Dave's mom, who stays with us during the winter. Because Nana is available all day, she is now kitty's best friend, who lets her in and out when she meows, keeps her feed bowl full and provides hours of petting and a soft lap to nap on. Nana even puts down her crochet hook when Alli comes to call.

As you can see, she even helps when Nana has a grandchild to hold for a nap. Alli wasn't always to have "her" napping place taken by someone else! However, the day  Nana went back up north for the summer, Alli laid in her chair all day, waiting for her Nana to come back. She had a rough summer without someone attending to her every desire, but she did make it and is enjoying Nana again. There are lots of studies out that suggest having pets is good for the elderly; it gives them companionship, and if they are involved in pet care, they have a sense of purpose and once again have someone depending on them. It can help make a long day more purposeful. Our situation is an ideal one because the animals are really ours, and in the long run, we are responsible for their upkeep and care; I wouldn't suggest just getting a companion pet for someone who lives on their own because it might be more than they could handle and become a burden.

Kitty is the main pet that Nana cares for, but she does keep food and water out for the "puppies" who are entering their fifth year. They aren't siblings, but we got a puppy for each of our kids at the same time; not our brightest moment.
However, we have two energetic dogs who spend part of their time outside and part of their time inside with us. The especially like to visit Nana, who has a tin of treats on her table, and makes sure everybody gets their biscuit every day. We do have to make sure they have settled down so they don't accidentally scratch her, she does not heal as quickly as she used to. Everybody loves Nana. She always has time to pet the Lab, who would sit and be petted all day if we didn't take her outside; Winry has learned some manners and no longer jumps up (or not often) but sits, impatiently wiggling, until the person she is pleading with notices, or until she gets too impatient and barks.
We will be adding more critters to the farm in the city in the next few months, critters with a bit more purpose, such as egg laying, and I'm looking forward to seeing how they impact our family. So far the addition of two dogs and a cat have been a good thing, though not without problems, I hope chickens and bunnies are just as beneficial.

Monday, November 28, 2011

Thanksgiving Break

We had a great Thanksgiving here on the Farm; three generations of family and the addition of friends made for a nice meal and some good catching up time. The really great thing about the Thanksgiving break was the additional days off work for me, which gave me some time to do a few things outside while it was nice. Also, cooking on Thursday and eating leftovers until Monday was great, at least from my point of view!
One of the things we did on was to take down the girl's swing-set. It was twenty years old and well loved, but was beginning to lean beyond repair. When Dave took it down we were glad we had done it, because the wood around the screws was beginning to rot, and it was definitely unsafe. Little bit was sad because she still likes to listen to music and swing, but we will have to relocate the swing to a tree or something for her. Nana lent a helping hand, or at least supervised.

 We also transplanted some hybrid blackberries that a former occupant had planted along a fence row. The problem is that the kudzu and honeysuckle have taken over the fence as well as the berries, causing them to not produce anymore. I have read that they don't like being moved and might revert back to having thorns, even so, thorny blackberries are better than none! The soil around the roots was so loose that it fell right off the plants, so it was like bare root plants from the nursery. Somewhere along the way I either can't count or I lost one, because I thought I had six, but could only find five when I planted.

 We haven't planted this area before, only mowed the weeds we call grass and left the grass to decay, and the soil is amazing! In places it was literally black, and all of the topsoil was filled with beautiful earthworms like this little guy:
They are wonderful for the soil and the plants. I'm so glad that we haven't sprayed pesticides over the years, it really enriches the good critters that live in the soil and garden, and they often will take care of those unsavory critters.


Another little project that we finished was the hoop house, a sort of mini greenhouse. We built it over a existing square foot bed that has some lettuce, spinach and beets growing in it, and I added onions and more beets. More details on this project as we tweak it and make it better. The main thing is that we have added one more way to extend our harvest!


Last but not least, we tried the hot sauce I made from the habanero peppers we grew last summer. I made it several weeks ago, but it has to "age". It is perfect, not too hot, but warm, and with its own taste, not just hot. Now if I could only remember how many peppers I used.......... I found the recipe here: South Texas Sunshine Hot Sauce  and boy is it good. The hard part was finding bottles. I ended up using beer bottles with a reusable swing top.
 

I like them very much, except they are big, and I'd like to share my hot sauce with friends and loved ones, but I can't give away that much at once! We use a lot of hot sauce! So, anyone that knows where I can get reusable, resealable bottles that are in the six ounce range, let me know, and maybe I'll share!

Friday, November 25, 2011

Flowers for Nana


Dave's mom, who is 85, stays with us during the winter, and although she is mobile, she doesn't go out much so I try to make the view from her favorite chair as interesting as possible. The violas above are one thing I have put in my herb bed to provide interest; they will be pretty for much of the winter and also in the spring. In hindsight I should have gotten pansys because the blossoms are larger and easier to see from the house. Next year.


I moved the birdbath around to the house side of the rosemary bush so I could put the cold frame on the south side and also moved all but one of my perennial herbs, also for the cold frame, but they provide a little visual interest too, at least until they get frost bitten. So far they have survived back to back 27* frosts, so they are doing pretty well. I need to harvest my chives before they die back, but they are so nice and green right now!


The next thing I added were some bird feeders; she loves to watch the birds! At her house she will have twenty or so hummingbirds buzzing around her porch in the summer. That is the down side of her only being here in the winter, no hummers. But between the birdbath and feeders she sees a lot of birds and enjoys them. Another up side is that the feeder is above an area that I want to mulch, and sunflower seed hulls make excellent mulch. We should have a good inch of mulch by spring!
Now, the reason that I thought about all this today is because while I was at Lowe's today buying stuff to make the hoop house (I'm so excited!) I saw crocus bulbs on clearance. The end of November seems late to be planting spring bulbs, but really, it has been so warm that they might have started growing had I planted any sooner. So I bought a bag of bulbs and planted them in the herb garden and along the driveway, since she and Dave walk down to get the mail every day. I'm sure they will be a delight to all of us at the beginning of March when we are all sick of dead trees and brownness.  Shhhh, don't tell her, it's a surprise!

Wednesday, November 23, 2011

Let Us Give Thanks

Thanksgiving is in the air; the preparations have begun, the food has started to accumulate and we (hopefully) have turned our thoughts to what we are really thankful for. I could make a long list of little things that I am truly thankful fur, such as flannel sheets, yellow leaves on the hickory tree and carrots pulled right from the garden, but I'm going to go for my top five, because the list could get unreasonably long, and everyone would fall asleep reading.
  1. God. I could leave it right there, but I don't feel I would do Him justice if I did. I am thankful to God for His protection and comfort in my life, providing me with sustenance, family, health and a place to call home. I have felt, since I was a small child, that He holds me in the hollow of his hand, protecting me and guiding me if only I have the sense to pay attention.
  2. Family. I am thankful for my husband of twenty-one years, our two girls, our parents and our siblings. I love them all very much and  they have made me who I am (for better or for worse!). I am thankful for the foster children who have shared our home and lives over the years. I am very thankful for our Church family; we are far away from our biological families and they fill that gap for us over and over. We have several "moms" and "dads" there.
  3. Friends. Many or our friends are from Church, but we have others from different areas of our lives. We have friends that we have camped with and had Thanksgiving with since 1999, watching our kids grow up and change over the years. We have friends who have provided respite care when we have had a special needs foster child. We have friends who we have shared joys and sorrows, triumph and disappointment, good times and bad. We have friends. Plural. What a joy.
  4. The Farm in the City. Christened thus by Dave's Dad when he first visited a decade ago, we are finally trying to fulfill that vision. I covet the days when my feet don't stray from the property and look forward to spending more and more time here. A place to call home, what a blessing.
  5. Food. I love food. I am so thankful that we have plenty and I know there are others who don't and who are working just as hard as we are to make ends meet. Let me remember to share the bounty of the Farm with those who don't have opportunity to grow their own.
So there it is, the Farm in the City top five things to be thankful for . Of course there is always the wind in the trees, the clothes drying on the line, the cat sunning herself, the trains passing behind our property, the dog jumping through the kudzu, the stars in the sky......amen and amen.

Saturday, November 19, 2011

Happy Birthday to Me!

One thing we don't have on the Farm in the city are fruit trees. We do have wild blackberries, if we can get to them before the kudzu covers them, blueberries, and a Concord grapevine. So this summer, when my Mom asked me what I wanted for my birthday, I said "Apple trees!". I ordered them from Stark Brothers, a nursery in Missouri that has a really good reputation, wide selection and some educational materials . They guarentee their trees for a year after purchase.
The tree I was after is what Mom calls an Early Transparent or Lodi; in my opinion it has the best apples for applesauce, making a tart, almost white sauce. Of course I had to have a pollinator, most apples aren't self fertile, so I also ordered a BraeStar, a type of Braeburn apple that is a crisp eating apple that stores well. The Lodi comes in early, mid July and the BraeStar is supposed to be ready in October, so I won't have all the apples to deal with at once. However, dealing with the apples won't be a problem for about three years, and who knows what else I'll be picking/eating/cooking/preserving by then!


So how does one plant an apple tree? First things first, figure out how big the tree will be when it is grown and what else you might plant in the area so you don't have your apple tree shading your blueberries. I have one dwarf and one semi-dwarf tree, so I have a spread of ten and fifteen feet for each of them, and that is about the height they will be. The plan for the Farm is to have, from southwest to northeast, berries, grapes, and then fruit trees, so the apple trees go on the northwest side of the lot, about thirteen feet apart. Then, dig a big hole. A really big hole.This one is about three feet across and a foot and a half to two feet deep. As I was digging I separated the dirt out into three piles; sod, topsoil and subsoil, or clay. This is so you can fill in the hole upside down, sod first, then topsoil then the clay. I learned this from the information Stark Brothers sent with the trees, by putting the nutritious topsoil on the bottom with the roots of the tree, it gets more of the good stuff, and doesn't have the clay baking around the roots later. I put in a small layer of sod, with the roots up, made a little cone of topsoil  set the bare root plant on top of the cone, and then filled in the area around the roots with topsoil and sod. I also mixed in some compost to help add nutrients and keep the soil loose. After filling the hole about 2/3 the way full, I stepped on the soil to compress it some and get the air pockets out, then filled it the rest of the way with topsoil and clay, making sure to leave the bud graft about two or three inches above the soil. That knobby part on the tree just above the mulch is the graft.


The last few steps are easy, cover the soil with mulch to keep the plant from getting either too hot in the summer or too cold in the winter and to preserve moisture. Normally this would be the time to water the tree and give it some liquid fertilizer, but we had two inches of rain a few days ago, and I am afraid that the roots will get waterlogged, so I am going to wait a day or two. Then I provided some protection for the little tree from critters, mostly our rotten dogs, I don't think bunnies come in this part of the yard since it is fenced, but the dogs do, and they like to dig! I used a piece of wire fencing that we have used for tomato cages and various other garden tasks to support or protect our plants.


So there it is, the beginning of the orchard on the Farm in the City, may they grow strong and fruitful.

Wednesday, November 16, 2011

Baby it's Cold Outside!

As the weather grows cooler, I'm trying to find ways to extend our growing season and continue to have fresh, homegrown food to eat. Sadly my fall crop of broccoli, cabbage and collards succumbed to deer/bunny/groundhog attacks so I have no traditional fall crops, other than the Romaine lettuce I planted from seed. Apparently the critters like the other stuff better because they left the lettuce alone, more or less.There shall be a tall, electrified fence before spring, because I love my broccoli!

In an effort to protect my food from other herbivores and the cold, I have built a cold frame. Just the name sounds a little intimidating, but everything I have read about cold frames indicates that they are easy to build, and easy to maintain. We started with an old window and some scrap lumber. I measured the window and my able helper who runs the power tools cut the boards to the specified lengths and I built a box the same size as the window using wood screws. Nails are ok, but my experience with nails and things that sit out in the weather is that they get loose and the whole thing falls apart.


Then I took another board, cut it the length of the short sides, measured an angle from the top corner to the bottom to get two triangular shaped pieces. We also cut an extra back board. Dave wanted to connect the angled boards and the back board with brackets, but I really liked the idea of using dowels and wood glue, so since it was my project, that's what we did. I my way fails, we can still go back and use the brackets to make a repair. I drilled holes in the angled boards, the backboard and matching (I hope) ones on the box and put pencil sized dowels in the holes in the boards using my favorite, waterproof wood glue, Titebond. We used it to hold wheels on car axles when we made wooden toys and the axle would break before the glue would let go.


Next, a bead of glue along the top of the box and a bunch in the holes I drilled.


 Then I lined up the dowels and the holes I had drilled and pushed the pieces together so the top was flush with the bottom and the two pieces were joined not only by the dowels but also by the glue. This did not work out perfectly with the back board as I was not very careful when lining up my holes, so I had to re-drill a couple. In the end the boards on the back didn't meet all the way across and I had to caulk the join so it didn't let all the warm air out.


I added some foam that we had used when
 we were installing the windows to insulate where the window meets the frame, but that isn't totally necessary, except that I joined the short pieces to the long pieces backwards and the window wasn't totally snug. Also, usually a window has a wooden sash and you attach hinges so you can raise and lower the window depending on the temperature; if it is 70 and sunny it can get to 100 in the frame! I just prop my window up, open the screen, or just remove the whole window if it is going to be too warm in the afternoon. I was reading about hoop houses ( another season extender- more on that later) and found that much of the sunlight never reaches the plants because of the angle of the winter sun, and a reflector is good. I found a piece of leftover flashing and installed that in the back of the box to maximize the available sunshine. The next step is to locate the box facing south on some good soil. I used the front of my herb garden near the house since it just had annuals that were about finished. I set it on some of the blue foam to protect the wood from moisture as much as possible, but have since seen a video that suggests setting it on bricks instead. I may change it to that because not only will it be drier and more aesthetically pleasing, it would add some height to the box for the plants.

Finally, I planted stuff! I had Romaine lettuce plants from the fall garden that I moved, and then planted spinach, radishes, more lettuce and carrots.
So far, so good. I take the lid off most days since it has been warm, not only so I don't roast my veggies too soon, but also so some of the moisture evaporates and the bed doesn't get moldy. You can't see it in the picture,  but I put a thermometer inside the box to record the highs and lows so I can have an idea of how things are going. If it is going to be really cold at night I will cover the box with a blanket or something. Otherwise, I'm going to just let it do its thing, it seems pretty low maintenance.

So there it is, your basic cold frame, built with stuff we had lying around, I shelled out $5.24 for the glue, but that is all, and I'll recoup that in lettuce alone. Obviously if you had to buy the lumber and a piece of plexiglass it would cost more, but we had plenty of stuff hanging about. Some people make cold frames from bales of hay and a window, I still have aother window, so I may try that one yet!


Wednesday, November 9, 2011

Some food for thought.......

I have gardened for as long as I can remember. Mom tells a story about me as a small child pulling carrots and washing them in the dog's water dish outside before eating them-at least I washed them! I have found myself recently washing a carrot in rainwater before eating it, it was delicious. (You can stop saying eeeewww now). I have a lot of memories of that little garden at the house on Maple Avenue; strawberries along the back fence, an apple tree to climb and to eat from, raspberries, chestnuts, plums...the list goes on and on, no wonder I was a forager for all of my childhood! Mom taught me how to recognize what I could and couldn't eat as well as when to expect it to be ripe. It still amazes me that we had so much on that tiny lot, surely it is only about 1/8 an acre!

Various types of gardening followed as I grew up and left home, container gardening at an apartment, a small plot at a rental house, a big, quickly weedy garden at our current house, and most recently a small, square foot garden that produced a lot of stuff for the space over the summer . Now I find myself in a situation where I want to produce most, if not all of our produce and some other things right here on our little farm in the city. This idea has lead me to a bunch of reading, no surprise to anyone who knows me, and I would like to share a few of the things I have been reading for anyone else who would like to grow even a little of their own food.

First and foremost is my original go to book, Joy of Gardening, by Dick Raymond. The inscription in it reads " Christmas 1995: To my wonderful sister Cheryl who will grow me yummy tomatoes next summer! Jennifer" What a productive gift it has been! I had borrowed this book so many times from the library that I was renting it when I forgot to take it back, so I was glad to have my own copy. Dick promotes wide rows (now called intensive agriculture, he was so ahead of his time) and gives many tricks to expand the growing season and to get more bang for your buck with your plants. I still use this book very often.


My next go to recently has been Square Foot Gardening, by Mel Bartholomew. In its own way, this method is the antithesis of Joy of Gardening because it emphasizes not wasting seed, planting each plant or seed purposefully and not crowding. However, both methods push the spacing closer than the seed packets recommend and get a lot of produce out of a small space.   Bartholomew's method emphasizes vertical growing for most big plants rather than cages for tomatoes or letting vine crops run on the ground. The plant descriptions are also very good at describing when to plant, transplant, and when to expect a harvest as well as if and when to plant succession crops.


Our friend Scott gave me a wonderful book twelve years ago, The Encyclopedia of Organic Gardening by Rodale Press. It has everything you need to know about organic gardening; how to prune, get rid of pests, when to plant etc... and all without putting things on your plants that you wouldn't want to eat. My copy is at least twenty years old and still very useful, you could probably find it used at a very low price. As a matter of fact, all three of these books have been out for years and can be found cheaply at used book stores.


Most recently I have been reading two more up to date books, The Quarter Acre Farm, by Spring Warren and Mini farming: self sufficiency on a 1/4 acre, by Brett L. Markham. Both are about using the small bit of land you have and making the most of it. I have much more space available to me than a quarter acre, so you know I'm salivating at the idea of being able to "live off the land". Markham's book is a more technical, how-to book that is very realistic while Warren's is more of a "how I did it book" that helps to inspire a would be farmer.


I've also been reading a lot about the urban or backyard homesteading movement, and will if things go as planned add our first productive animals to the farm on the city: chickens and rabbits. Ok, so the cat does rodent control, but other than that, all the other animals we have just eat and dig holes in the yard. A good book that I purchased which addresses the small acreage homestead is The Backyard Homestead: Produce all the food you need on just a quarter acre! edited by Carleen Madigan, put out by Storey Publishing. Storey has a whole line of books on farm animal care: goats, chickens, horses etc... but this book is a compilation of many of their other books. It covers a lot of gardening and preservation skills and planning also, and excellent choice if you are only going to get one book about homesteading.


So there you go, some food for thought as we go into the dark days of winter. I'm looking forward to the next year as we try to produce, use and share as much food as we can. Even if I fail in the goal, there is something about being outside and doing something productive that invigorates me, I'm working harder physically than I have in a long time, but I feel terrific-except the sore muscles from double digging a 4x4 bed yesterday. Even the tops of my feet hurt, but I'll be back at it tomorrow.

Sunday, November 6, 2011

Putting the beds to bed

This weekend I have spent a little time putting some of the garden squares to bed for the winter. They have produced nicely this year, but I want to ensure that the soil is nice and fertile when spring comes and I plant them again.  First I pulled all the plants and cut the vines off the trellis; more stuff for the compost pile! Then I added a wheelbarrow full of chopped leaves and a wheelbarrow full of manure (which amounts to about an inch of manure over a 4x4 square).


The leaves I chopped with the bagging attachment on our leaf blower, however I think the lawnmower attachment would chop them finer and may use it for the next batch. I'll need a bunch for the strawberries too. For the organic gardener, a friend with manure producing animals is a gold mine. We have a friend (Cynthia) who has horses and is just as happy as can be to let me run off with a truck load of manure, much of it already composted. I just put it straight on the beds with the leaves to compost over the winter, since it will be at least four months before I plant-plenty of time for it to break down. I would use chicken manure the same way, and may have my own little poo producers next spring, but unless it is going to sit for a while, compost the manure first or it might burn the plants. Rabbit manure is so mild that it can be put straight on the bed, plants or no plants.
After putting the leaves and manure on the garden I used my garden claw to mix them in.  In the first bed I put the manure out first, then the leaves, and since the leaves were still pretty big, they mostly got clogged up in the claw; the manure over the leaves mixed much better. I'll turn the beds another couple times in the next few weeks to mix things up better. Once I get some lime I will add some of that too since I haven't used it in a few years and my soil tends to be a bit acidic, and oak leaves, which I used, are high in acid. Great for blueberries, not so much for vegetables. I'm also going to have a soil test done for various areas of the yard/garden so I can spot any deficiencies before I plant.Our Agricultural Extension Agency does this for free. I also have a home test kit, but I like the professional analysis too.

So there you are, one bed, put to bed for the winter!


By the way, one of the by products of cleaning up the beds is harvesting the turnips; we are having turnip greens and boiled turnips with dinner tonight. Everything is better with bacon, right?


Friday, November 4, 2011

It's been busy down on the farm

I just realized the other day that I hadn't posted in a month, and a lot has happened, which is why I haven't been writing; I've been too busy doing! I thought that farmers took in their harvest in the fall and then spent the rest of the fall and winter sharpening tools and looking at seed catalogs-not so! I have always been a gardener who stopped gardening towards the end of August, but because I have a lot of expansion plans between now and spring, I have kept going, and still have more to do. However, I'll give a quick update on the projects and write more detail later.

One of the things we have done is to plant fall strawberries. I am the impatient type, and I have a real problem planting strawberries in the spring and not getting any berries until the next spring. I kept thinking about the strawberry farmers I know who plant a new crop each year, and they plant in the fall, so after much searching I found a place that sold fall strawberry plants and ordered twenty five. I have two varieties, Sweet Charlie and Chandler, both of which are supposed to do well in our area.This is what they looked like after planting:


I also planted a fall garden; broccoli, cabbage, turnips, radishes, carrots, lettuce, collards, spinach and chard. The collards have been eaten by some four legged critter, the broccoli and cabbage were also munched on, but survived and may yet produce something. Here are some of the pictures of the things we have been able to eat:


Don't get too excited about the size of the carrots, note my thumb beside them, they are pretty small, but they are delicious at that size. We also have turnips, but I haven't taken any pictures. I also have been making some things with our herbs and have tried my hand at hot sauce.

Another project intended to extend our growing season is a cold frame. I have always wanted to build one but have lacked motivation. I'll provide a blow by blow description later, but basically I built a box and put an old window on top of it to create my own little "greenhouse" I have planted lettuce, spinach, radishes, and onions in it, and I may make another one in the garden proper with the other window later. It's a little rough, but I did make it myself!


So, until I can write in more detail about the other stuff going on here that's it! Another busy day tomorrow, but I'm really loving getting more out of our real estate than a yard to mow.

Thursday, September 29, 2011

Sunflowers

The latest preservation project on the farm is roasting sunflower seeds. I love growing sunflowers, they are huge, beautiful, cheerful flowers that require very little from me besides decent soil and a little water when it is dry.
I planted one Mammoth  sunflower seed in a one foot by one foot square of one of my square foot gardens. It grew to be taller than me, not a great feat since I'm only 5'4", but still, in a few months this plant grew from a tiny seed to a huge plant! Of course I didn't take a picture of it when it was beautiful and yellow, but I did take one after we cut it off the stem and brought it in to roast.


Isn't the spiral pattern lovely? For those math folks out there, the rows are sequences of Fibonacci numbers which I won't try to explain, but it makes for the most efficient packing of the seeds into the seed head. The way God does things is pretty amazing, beauty and efficiency all in one package.

After we cut the head, Dave did the grunt work of rubbing the florets off the seeds, which is a somewhat tedious job, because not only did he have to rub off the florets, but he also had to remove the part of the plant that held the seeds in place so we could get down to just the seeds. Next year we may try doing this part outside in front of an electric fan, tossing the stuff in the air to separate the lighter stuff from the heavy seeds. We really like to eat sunflower seeds, so we will plant more than just one next year.

I always wondered how the sunflower seeds in the shell we bought had such a lovely salt coating, but no salt crystals, a few minutes on the internet, and I discovered their secret: soak the seeds in salt water overnight. Who knew? I'm glad we soaked them, the water was a little dirty looking, so besides adding that lovely saltiness, they got cleaner! Next, a trip to the oven on the cookie sheet.

 That is all the seeds from just one head on an average size cookie sheet. We roasted them about forty minutes at 300*F, until they started to brown.


Voila! the finished product. We of course had to try them out immediately and found that many of our little shells had no seed. Bummer. The ones we found with kernels were wonderful, but they were too few. I researched the situation a little and I think that the problem is lack of sufficient pollination. The seed head is actually not a flower, but a head that holds hundreds of little florets, each one needing to be pollinated, each one having a little seed under the floret that doesn't develop the fruit (kernel) if it isn't pollinated by our busy helpers, the bees.  Sunflowers are self pollinating, so they don't need more than one plant to fruit, but with most fruits, the more the merrier! Also, more flowers attract more bees. That fits in nicely with our plan to plant more sunflowers next year. If we clear enough area and have the space we may grow some of the black oil sunflowers so we can have some for the birds. For now, I guess we may as well enjoy as much of the fruits, or seeds of our labor as possible.


Saturday, September 24, 2011

Can we talk..........compost?

The lifeblood of any good gardening situation is the soil. We have been blessed with abundant, fertile soil in which most things grow well with little intervention from us; just plant it and it will grow. This summer we had to do a bit more watering than usual, and I actually kept things mostly weeded. However, since I prefer to not add chemicals to my food, I use compost and some natural fertilizer to give the heavy feeders a little boost in their growth.

I have been composting in one form or another for over a decade, sometimes efficiently, sometimes...not so much. Once you start composting, you will never see a pile of leaves or vegetable scraps the same way, I have been know to ask my friends for their bags of grass clippings (thanks David), apple peels, Halloween pumpkins, watermelon rinds and so on. I don't ask for leaves because we have several oak trees that keep me well supplied.

One of our newer projects is a new compost bin. I had made one from some cinder blocks we had sitting around, but it only had one bin, was a little small and in a bad location. So we took some pallets and built a new two bin model. I love the pallets, even though I know that they will deteriorate in a few years, but they are free, abundant and perfectly designed for a compost bin.
 We lucked out because we had a very large pallet and the back wall is all one piece so it is more stable, but two nailed together would work just fine. As you can see we just added three "sides" to the back wall, leaving the front open for adding materials. The pallets are terrific because they have spaces, which creates some airflow, a very desirable thing in compost. With two bins I will have one side (in this picture the left) that has almost finished compost that just needs to cook a little longer, and the other side that I am actively adding materials to. If I find that I have a larger pile I may add a six inch board to the bottom to help keep things from spilling out. I keep a pitchfork by the bin so I can turn the materials easily and also pick up leaves to add to the pile when I add greens.

Which brings us to the question everyone asks: Doesn't it smell and attract rodents? I will say that I have never seen evidence of rat activity, I can't speak for the mice since they are so small, and even though we have possums and racoons, I haven't seen any signs they have bothered things. As far as the smell, if you do it right, it is not a problem, if you don't, it can be. Case in point, I received a lovely bag of leftovers from Renee when she made grape jelly, and in addition to that added the leftover mash from making apple juice. The result was too much nitrogen (greens) and not enough carbon (browns) and I had some flies and a lovely fermentation odor. However, it was easily fixed by turning the pile and adding some more leaves. Balance is the main thing with compost, and it is best to err on the side of caution and add too many leaves; they will still break down, but it will just take longer. Outdoor composting does attract insects, however they are not the kind that will live in your house, so you don't need to worry about them. When you add food scraps always cover them with a layer of leaves and you will have no problem with flies; they don't dig and if they can't just land on the food they leave it alone. I thought about taking a picture of all the critters on the apple/grape mash when I turned it, but thought it might freak folks out.

Last but not least, what do you do with the compost once it is finished? How do you know it is finished? Once you really can't tell what the compost was originally made of and it looks like really rich, dark brown dirt, it is finished. You may still have some big chunks, like sunflower stalks or eggshells, but the majority is dark and crumbly. Take any big pieces and toss them on the still cooking pile and you have some nice, beautiful compost, ready to use. One of my favorite uses, since I don't have lots of compost at a time is to use it like a mulch, especially for new plantings like broccoli or tomatoes, because it suppresses weeds and feeds my new plant! Of course I never am patient enough to let my compost finish completely and it doesn't get as hot as a pile with manure so the seeds aren't killed. I usually have to pull up a few cantaloupe plants or watermelons after a week or so. Also, if you have lots of compost, it is great to just turn it into your soil to improve either the nutrients or the amount of organic material. With clay soil the organic material is the more important feature, because without the leaves and "stuff" it just bakes in the sun and doesn't retain water very well.
Well kids, there it is, compost 101, a very simplified version of a fairly simple, yet important to the gardener, topic.  

Tuesday, August 30, 2011

Sun dried apples

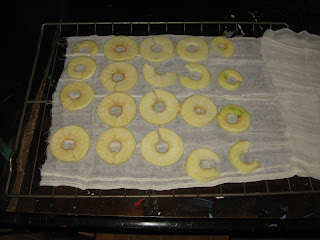
We went and picked apples with friends a few weeks ago and I am still trying to figure out what to do with the bushel that I picked. I know, a bushel? Without a plan? But they were so delicious and the price was right and we drove out in the country to get them and what if I wanted more and didn't have time to go get more? So, I have made two quarts of  apple juice/cider, which lasted about two days, and have given away some, and I feel too lazy to make applesauce yet. I have been wanting to try drying fruit and thought this would be a great opportunity, but little did I know it would be such a pain to find the stuff to do it! One would think a piece of screen and something to cover it with to keep the flies off would work, but of course the more I read about food drying, the more difficult it appeared! Regular screen isn't good, it has toxins in it, food grade screen is required and is difficult to find, even online. Cheesecloth is good to cover the fruit, but more difficult to find locally than I anticipated. So I ended up using my oven rack to lay the apples on, Renee gave me a lead on a local source for the cheesecloth and I ended up with this:
That is two apples on half of the cheesecloth, I covered them with the other half and set them out in the sun for about four hours. This is what they looked like when I brought them in:
Yesterday, I set them out before I went to work, and of course, it is the only day it has rained in ages, and it poured for an hour before I got home, so I had partially rehydrated apples. I put them in the oven for about half an hour at 170* to dry them out a little so they didn't mold. I hoped that one more day in the sun-without rain- might finish them off. I changed things up a little, I put the apples on cake racks on a black cookie sheet with the cheesecloth over them. That worked like a charm!
At this point they are completely dry, just like you would buy in the store. I didn't add any lemon juice because we don't care if they are brown. If it looks like there are fewer apples rather than just smaller apples, you would be right, we kept sampling at each stage. I need to get more cheesecloth or a piece of muslin so I can do more at a time on the oven rack. We found that laying them directly on the cake rack caused them to pick up a bit of a metallic taste, so I won't do that again. Other than that, I think the experiment went well. I'm going to try again tomorrow!

Sunday, August 28, 2011

Let the Hurricane winds blow!

Well, hurricane Irene left us high and dry! While the eastern half of the state was getting several inches of much needed rain, all we received was a lot of wind and a cloudy day. However, the cloudiness was exactly what I needed for my task for the day, planting some fall seedlings. I took off on a reconnaissance  mission at Southern States and I found that they had many of the things that I will be needing in the future, including chicken supplies and seed for clover, along with several other cover crops. They also have several varieties of chicks in late February, so we have a local supplier for chickens at that time. I like the idea of being able to pick several different types all at the same time so they grow up together; I know that at some time I'll have to introduce new chickens to the flock, but I'd like to start off easy. They also had some broccoli and cabbage plants; I bought four cabbages that I hope to turn into some lovely cabbage rolls in November and eight broccoli, because I found out in the spring that four are not enough for us! We really like broccoli. I had to both put water in the planting hole before planting and water again after planting since it is so very dry. Then I did the ultimate twofer; I mulched the plants with a layer of compost, giving the plants both nutrition and moisture conservation. I would post a picture of the plantings, but it looks just like the one I took in the spring, so I'll show you the little friend we found in the frame I was planting:
Our toad friend

 We always have toads in the garden, and I love having them there. They are little insect destroyers. I try to do what I can to attract them because we don't use insecticides and I love the free insect service. We really don't have a big problem with pests of the six legged variety, just the four legged variety. As you can see in the next picture, I have wire around the back of the tomatoes, and over the bed to keep the deer/bunnies/groundhogs out of my food.
Vertical Tomatoes

We are growing four tomatoes vertically in four square feet of soil, whereas if we were growing them in traditional cages or staked they would take sixteen square feet, or the whole square. In retrospect, I need to use either wire or stouter string for the trellis because this one is sagging with the weight of the tomatoes. See the almost ripe Cherokee Purple? The deer got all of the last ones because I let my guard down and left the wire off just before several tomatoes ripened.  In front of them I have recently planted a mix of radishes, turnips, beets, onions and spinach. I haven't seen any spinach yet, it think it might be too hot for the seed to germinate, so maybe it will turn up later when it cools down.
Seedlings


This seedling bed previously had onions, turnips, lettuce and spinach in it. I'm trying to get the most of the long growing season by planting succession crops this year, of course with the drought I'm having to water much more than I want to, I just hope that we will get some rain soon.

Friday, August 26, 2011

Not quite a farm-yet

Several years ago when Dave's dad visited us he christened our little plot the "Farm in the City". We are in the city limits, and it isn't much of a farm yet, but it is a nice size piece of real estate for a city lot, a little over an acre. The neighborhood kind of has a country feel, or used to when we bought the house over ten years ago. There has been some development etc that has caused it to loose some of that feel, but the houses to our right and left and their lots have stayed much the same; mature oaks and hickorys, some grass, and the ever present kudzu.

We have talked off and on about adding to the small garden, hickory trees, two dogs and a cat that we have already, but the only real, permanent things we have done is to plant some blueberry bushes and a grape vine. Granted, they produce, but we could do so much more. And so it begins, our quest to have a real farm in the city. As of now I am ordering apple trees and blackberry canes and preparing the soil in various parts of  the lot for food next spring. Also, for the first time I am going to plant fall crops, I hope to get some broccoli and cabbage tomorrow. Oh yes, and we are going to get chickens. I am currently planning a coop that we hope to build completely, with the possible exception of the hardware, from salvaged and scrap material. So if you have some extra hinges..........

Spring square foot garden-broccoli, lettuce, cabbage
I thought that writing about what is going on might be interesting to someone else who is on the same quest; a bit of independence and good use of our God given resources. OK, so I thought at least my sister and my mom would read what I have to say. And maybe my brother. And if I'm really lucky, my kids, who are probably going to try to ignore the whole thing. So, off to the next thing, hopefully I'll not lose steam and stop writing, I think it is going to be an interesting year.